Objectives
When you finish this course, you should understand:
- What containers are and their benefits
- How to find and run Docker containers from the Docker Hub
- How to create your first Docker container and understand the layering and union file system
- The best practices when developing Dockerfiles
- How to solve problems of orchestration: reconciliation, scaling, high availability, and service discovery
- Some of the tools that can help you run highly available applications in production, such as the IBM Container service
Prerequisites
You don't need to know anything about containers to take this course, and no extensive programming experience is required. However, you must know how to run command-line tools from your workstation.
If you don't have Docker already, you need install Docker Community Edition (CE) or use the use Play-with-Docker for all the labs in this course. Docker installations are available from store.docker.com for your Mac, Windows, or Linux machine.
This course shows you how to install Docker.
You must also have a Docker Hub account to complete Lab 3. If you don't already have one, go to Play-with-Docker and follow the prompts to create an account.
Course labs
By completing these labs, you'll get hands-on experience creating your first Docker container. Each lab is followed by a lab solution video in case you have questions or can't complete the lab.
Lab 1: Run your first container and learn how to inspect it. Explore the Docker Hub and discover common images ready to be run.
Lab 2: Create a custom Docker Image built from a Dockerfile and push it to a central registry where it can be pulled to be deployed on other environments. Learn about the union file system and copy-on-write, and how they help you deliver applications faster.
Lab 3: Deploy containers using Docker swarm and learn how Docker Swarm helps solve problems such as reconciliation, scaling, high availability and service discovery. In this lab, you'll use Play-with-Docker for a multi-node cluster rather than use your locally installed Docker.
Grading
The minimum passing mark for the course is 80% with the following weights:
- 60%: Final exam
- 40%: All module quizzes
The only grade that matters is the overall grade for the course.
The final exam has a 1-hour time limit.
Attempts allowed per question:
- One attempt for True/False questions
- Two attempts for any question other than True/False
Check your grades in the course at any time by clicking the Progress tab.
Install Docker or use Play-With-Docker
Install Docker
If you don't want to install Docker, skip this part and go to the next section "Use Play-With-Docker."
- Navigate to http://store.docker.com.
- Select Community Edition.
- Select the filters for your operating system or platform and install Docker.
Use Play-With-Docker
If you don't want to install Docker, an alternative is to use Play-With-Docker, which is a website where you can run terminals directly from your browser that have Docker installed.
All of the labs for this course can be run on Play-With-Docker though it's recommended that you install Docker locally on your host so that you can continue your Docker journey when you're done with the course. To use Play-With-Docker, navigate to http://play-with-docker.com in your browser. Then, follow the instructions in each lab.
What are containers?
- A Group of processes run in isolation
- All Processes MUST be able to run on the shared kernel.
- Each Container hat its own set of "namespace" (isolated view)
- PID - Process IDs
- USER - user and group IDs
- UTS - Hostname and Domain name
- NS - mount points
- NET - Network Devices, stacks, ports
- IPC - Inter-process communications, message queues,
- cgroups - control units and monitoring of resources.

What is Docker ?
- At its core, Docker is tooling to means containers
- Simplified existing technology to enable it for the masses
- Enable developers to use containers for their application.
- package dependencies with containers: ''build once, run anywhere?
Why containers are Appealing to Users
- No More ''Works on my machine''
- Lightweight and Fast
- Better resource utilization
- Can fit far more containers than VMs into a host
- Standard developer to operations interface
- Ecosystem add tooling
1.Run a container
Use the Docker CLI to run your first container.
Open a terminal on your local computer and run this command:
& docker container run -t ubuntu top
You use the
docker container runcommand to run a container with the Ubuntu image by using thetopcommand. The-tflag allocates a pseudo-TTY, which you need for thetopcommand to work correctly.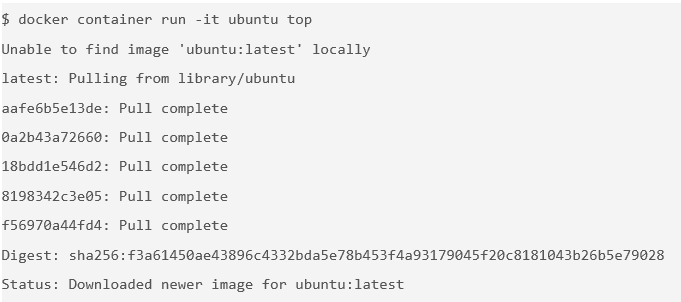
The
docker runcommand first starts adocker pullto download the Ubuntu image onto your host. After it is downloaded, it will start the container. The output for the running container should look like this: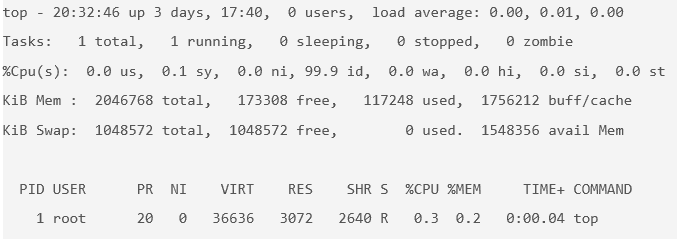
topis a Linux utility that prints the processes on a system and orders them by resource consumption. Notice that there is only a single process in this output: it is thetopprocess itself. You don't see other processes from the host in this list because of the PID namespace isolation.Containers use Linux namespaces to provide isolation of system resources from other containers or the host. The PID namespace provides isolation for process IDs. If you run
topwhile inside the container, you will notice that it shows the processes within the PID namespace of the container, which is much different than what you can see if you rantopon the host.Even though we are using the Ubuntu image, it is important to note that the container does not have its own kernel. It uses the kernel of the host and the Ubuntu image is used only to provide the file system and tools available on an Ubuntu system.
Inspect the container:
docker container exec
This
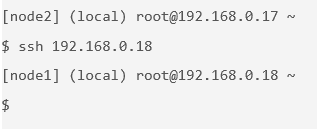
command allows you to enter a running container's namespaces with a new process.Open a new terminal. To open a new terminal connected to node1 by using Play-With-Docker.com, click Add New Instance on the left and then ssh from node2 into node1 by using the IP that is listed by node1, for example:
In the new terminal, get the ID of the running container that you just created:
docker container ls

Use that container ID to run
bashinside that container by using thedocker container execcommand. Because you are using bash and want to interact with this container from your terminal, use the-itflag to run using interactive mode while allocating a psuedo-terminal:$ docker container exec -it b3ad2a23fab3 bash root@b3ad2a23fab3:/#
You just used the
docker container execcommand to enter the container's namespaces with the bash process. Usingdocker container execwithbashis a common way to inspect a Docker container.Notice the change in the prefix of your terminal, for example,
root@b3ad2a23fab3:/. This is an indication that you are running bash inside the container.Tip: This is not the same as using ssh to a separate host or a VM. You don't need an ssh server to connect with a bash process. Remember that containers use kernel-level features to achieve isolation and that containers run on top of the kernel. Your container is just a group of processes running in isolation on the same host, and you can use the command
docker container execto enter that isolation with thebashprocess. After you run the commanddocker container exec, the group of processes running in isolation (in other words, the container) includestopandbash.From the same terminal, inspect the running processes:
$ ps -ef

You should see only the
topprocess,bashprocess, and yourpsprocess.For comparison, exit the container and run
ps -efortopon the host. These commands will work on Linux or Mac. For Windows, you can inspect the running processes by usingtasklist.root@b3ad2a23fab3:/# exit exit $ ps -ef # Lots of processes!
PID is just one of the Linux namespaces that provides containers with isolation to system resources. Other Linux namespaces include:
- MNT: Mount and unmount directories without affecting other namespaces.
- NET: Containers have their own network stack.
- IPC: Isolated interprocess communication mechanisms such as message queues.
- User: Isolated view of users on the system.
- UTC: Set hostname and domain name per container.
These namespaces provide the isolation for containers that allow them to run together securely and without conflict with other containers running on the same system.
In the next lab, you'll see different uses of containers and the benefit of isolation as you run multiple containers on the same host.
Tip: Namespaces are a feature of the Linux kernel. However, Docker allows you to run containers on Windows and Mac. The secret is that embedded in the Docker product is a Linux subsystem. Docker open-sourced this Linux subsystem to a new project: LinuxKit. Being able to run containers on many different platforms is one advantage of using the Docker tooling with containers.
In addition to running Linux containers on Windows by using a Linux subsystem, native Windows containers are now possible because of the creation of container primitives on the Windows operating system. Native Windows containers can be run on Windows 10 or Windows Server 2016 or later.
Clean up the container running the
topprocesses:<ctrl>-c
2. Run multiple containers
Explore the Docker Store.
The Docker Store is the public central registry for Docker images. Anyone can share images here publicly. The Docker Store contains community and official images that can also be found on the Docker Hub.
When searching for images, you will find filters for Store and Community images. Store images include content that has been verified and scanned for security vulnerabilities by Docker. Go one step further and search for Certified images that are deemed enterprise-ready and are tested with Docker Enterprise Edition.
It is important to avoid using unverified content from the Docker Store when you develop your own images that are intended to be deployed into the production environment. These unverified images might contain security vulnerabilities or possibly even malicious software.
In the next step of this lab, you will start a couple of containers by using some verified images from the Docker Store: NGINX web server and Mongo database.
Run an NGINX server by using the official NGINX image from the Docker Store:
$ docker container run --detach --publish 8080:80 --name nginx nginx
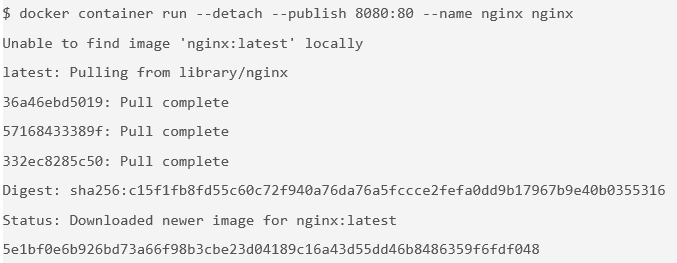
You are using a couple of new flags here. The
--detachflag will run this container in the background. Thepublishflag publishes port 80 in the container (the default port for NGINX) by using port 8080 on your host. Remember that the NET namespace gives processes of the container their own network stack. The--publishflag is a feature that can expose networking through the container onto the host.How do you know port 80 is the default port for NGINX? Because it is listed in the documentation on the Docker Store. In general, the documentation for the verified images is very good, and you will want to refer to it when you run containers using those images.
You are also specifying the
--nameflag, which names the container. Every container has a name. If you don't specify one, Docker will randomly assign one for you. Specifying your own name makes it easier to run subsequent commands on your container because you can reference the name instead of the id of the container. For example, you can specifydocker container inspect nginxinstead ofdocker container inspect 5e1.Because this is the first time you are running the NGINX container, it will pull down the NGINX image from the Docker Store. Subsequent containers created from the NGINX image will use the existing image located on your host.
NGINX is a lightweight web server. You can access it on port 8080 on your localhost.
- Access the NGINX server on http://localhost:8080.

Run a MongoDB server. You will use the official MongoDB image from the Docker Store. Instead of using the
latesttag (which is the default if no tag is specified), use a specific version of the Mongo image: 3.4.$ docker container run --detach --publish 8081:27017 --name mongo mongo:3.4
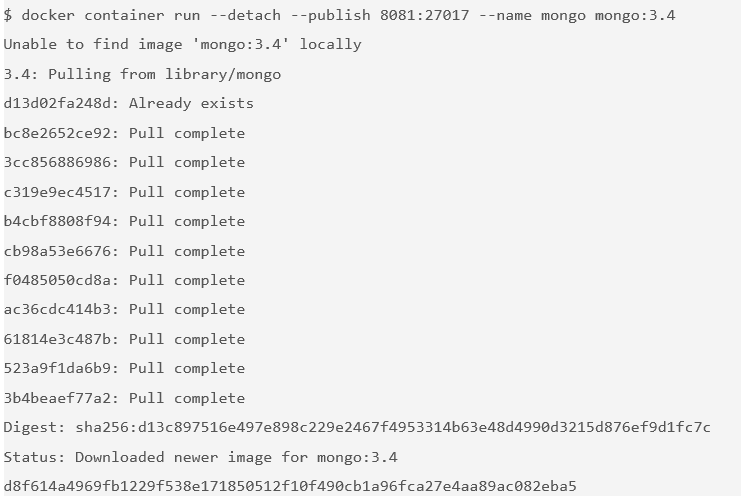
Again, because this is the first time you are running a Mongo container, pull the Mongo image from the Docker Store. You use the
--publishflag to expose the 27017 Mongo port on your host. You must use a port other than 8080 for the host mapping because that port is already exposed on your host. See the documentation on the Docker Store to get more information about using the Mongo image.- Access http://localhost:8081 to see some output from Mongo.

Check your running containers:
$ docker container ls

You should see that you have an NGINX web server container and a MongoDB container running on your host. Note that you have not configured these containers to talk to each other.
You can see the nginx and mongo names that you gave to the containers and the random name (in this example, priceless_kepler) that was generated for the Ubuntu container. You can also see that the port mappings that you specified with the
--publishflag. For more information on these running containers, use thedocker container inspect [container id]command.One thing you might notice is that the Mongo container is running the
docker-entrypointcommand. This is the name of the executable that is run when the container is started. The Mongo image requires some prior configuration before kicking off the DB process. You can see exactly what the script does by looking at it on GitHub. Typically, you can find the link to the GitHub source from the image description page on the Docker Store website.Containers are self-contained and isolated, which means you can avoid potential conflicts between containers with different system or runtime dependencies. For example, you can deploy an app that uses Java 7 and another app that uses Java 8 on the same host. Or you can run multiple NGINX containers that all have port 80 as their default listening ports. (If you're exposing on the host by using the
--publishflag, the ports selected for the host must be unique.) Isolation benefits are possible because of Linux namespaces.Remember: You didn't have to install anything on your host (other than Docker) to run these processes! Each container includes the dependencies that it needs within the container, so you don't need to install anything on your host directly.
Running multiple containers on the same host gives us the ability to use the resources (CPU, memory, and so on) available on single host. This can result in huge cost savings for an enterprise.
Although running images directly from the Docker Store can be useful at times, it is more useful to create custom images and refer to official images as the starting point for these images. You'll learn to build your own custom images in the next lab.
3.Remove the containers
Completing this lab creates several running containers on your host. Now, you'll stop and remove those containers.
Get a list of the running containers:
$ docker container ls

Stop the containers by running this command for each container in the list:
$ docker container stop [container id]
You can also use the names of the containers that you specified before:
$ docker container stop d67 ead af5
d67
ead
af5
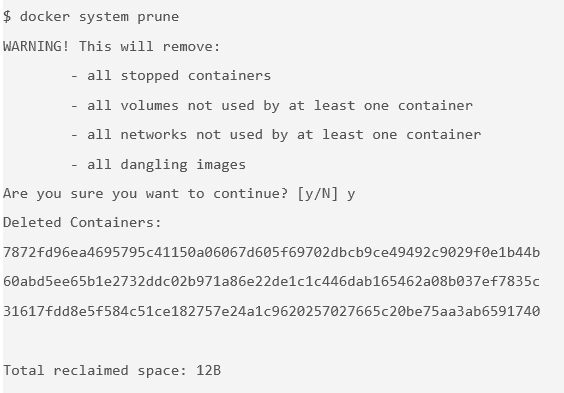
Tip: You need to enter only enough digits of the ID to be unique. Three digits is typically adequate.Remove the stopped containers. The following command removes any stopped containers, unused volumes and networks, and dangling images:
$ docker system prune
Lab
Lab 1 summary
In this lab, you created your first Ubuntu, NGINX, and MongoDB containers.
You should now understand more about containers:
- Containers are composed of Linux namespaces and control groups that provide isolation from other containers and the host.
- Because of the isolation properties of containers, you can schedule many containers on a single host without worrying about conflicting dependencies. This makes it easier to run multiple containers on a single host: using all resources allocated to that host and ultimately saving server costs.
- That you should avoid using unverified content from the Docker Store when developing your own images because these images might contain security vulnerabilities or possibly even malicious software.
- Containers include everything they need to run the processes within them, so you don't need to install additional dependencies on the host.
Lab 1 solution video
1. Create a Python app (without using Docker)
Level 2 headings may be created by course providers in the future.
Copy and paste this entire command into the terminal. The result of running this command will create a file named app.py.
echo 'from flask import Flask

app = Flask(__name__)

@app.route("/")
def hello():
    return "hello world!"

if __name__ == "__main__":
    app.run(host="0.0.0.0")' > app.py
This is a simple Python app that uses Flask to expose an HTTP web server on port 5000. (5000 is the default port for flask.) Don't worry if you are not too familiar with Python or Flask. These concepts can be applied to an application written in any language.
Optional: If you have Python and pip installed, run this app locally. If not, move on to the next section of this lab.
$ python3 --version
Python 3.6.1
$ pip3 --version
pip 9.0.1 from /usr/local/lib/python3.6/site-packages (python 3.6)
$ pip3 install flask
Requirement already satisfied: flask in /usr/local/lib/python3.6/site-packages
Requirement already satisfied: Werkzeug>=0.7 in /usr/local/lib/python3.6/site-packages (from flask)
Requirement already satisfied: itsdangerous>=0.21 in /usr/local/lib/python3.6/site-packages (from flask)
Requirement already satisfied: Jinja2>=2.4 in /usr/local/lib/python3.6/site-packages (from flask)
Requirement already satisfied: click>=2.0 in /usr/local/lib/python3.6/site-packages (from flask)
Requirement already satisfied: MarkupSafe>=0.23 in /usr/local/lib/python3.6/site-packages (from Jinja2>=2.4->flask)
johns-mbp:test johnzaccone$ pip3 install flask
Requirement already satisfied: flask in /usr/local/lib/python3.6/site-packages
Requirement already satisfied: itsdangerous>=0.21 in /usr/local/lib/python3.6/site-packages (from flask)
Requirement already satisfied: Jinja2>=2.4 in /usr/local/lib/python3.6/site-packages (from flask)
Requirement already satisfied: click>=2.0 in /usr/local/lib/python3.6/site-packages (from flask)
Requirement already satisfied: Werkzeug>=0.7 in /usr/local/lib/python3.6/site-packages (from flask)
Requirement already satisfied: MarkupSafe>=0.23 in /usr/local/lib/python3.6/site-packages (from Jinja2>=2.4->flask)
$ python3 app.py
 * Running on http://0.0.0.0:5000/ (Press CTRL+C to quit)
2. Create and build the Docker image
If you don't have Python installed locally, don't worry because you don't need it. One of the advantages of using Docker containers is that you can build Python into your containers without having Python installed on your host.
Create a file named
Dockerfileand add the following content:FROM python:3.6.1-alpine RUN pip install flask CMD ["python","app.py"] COPY app.py /app.py
A Dockerfile lists the instructions needed to build a Docker image. Let's go through the Dockerfile line by line.
FROM python:3.6.1-alpineThis is the starting point for your Dockerfile. Every Dockerfile typically starts with a
FROMline that is the starting image to build your layers on top of. In this case, you are selecting thepython:3.6.1-alpinebase layer because it already has the version of Python and pip that you need to run your application. Thealpineversion means that it uses the alpine distribution, which is significantly smaller than an alternative flavor of Linux. A smaller image means it will download (deploy) much faster, and it is also more secure because it has a smaller attack surface.Here you are using the
3.6.1-alpinetag for the Python image. Look at the available tags for the official Python image on the Docker Hub. It is best practice to use a specific tag when inheriting a parent image so that changes to the parent dependency are controlled. If no tag is specified, the latest tag takes effect, which acts as a dynamic pointer that points to the latest version of an image.For security reasons, you must understand the layers that you build your docker image on top of. For that reason, it is highly recommended to only use official images found in the Docker Hub, or noncommunity images found in the Docker Store. These images are vetted to meet certain security requirements, and also have very good documentation for users to follow. You can find more information about this Python base image and other images that you can use on the Docker store.
For a more complex application, you might need to use a
FROMimage that is higher up the chain. For example, the parent Dockerfile for your Python application starts withFROM alpine, then specifies a series ofCMDandRUNcommands for the image. If you needed more control, you could start withFROM alpine(or a different distribution) and run those steps yourself. However, to start, it's recommended that you use an official image that closely matches your needs.RUN pip install flaskThe
RUNcommand executes commands needed to set up your image for your application, such as installing packages, editing files, or changing file permissions. In this case, you are installing Flask. TheRUNcommands are executed at build time and are added to the layers of your image.CMD ["python","app.py"]CMDis the command that is executed when you start a container. Here, you are usingCMDto run your Python applcation.There can be only one
CMDper Dockerfile. If you specify more than oneCMD, then the lastCMDwill take effect. The parent python:3.6.1-alpine also specifies aCMD(CMD python2). You can look at the Dockerfile for the official python:alpine image.You can use the official Python image directly to run Python scripts without installing Python on your host. However, in this case, you are creating a custom image to include your source so that you can build an image with your application and ship it to other environments.
COPY app.py /app.pyThis line copies the app.py file in the local directory (where you will run
docker image build) into a new layer of the image. This instruction is the last line in the Dockerfile. Layers that change frequently, such as copying source code into the image, should be placed near the bottom of the file to take full advantage of the Docker layer cache. This allows you to avoid rebuilding layers that could otherwise be cached. For instance, if there was a change in theFROMinstruction, it will invalidate the cache for all subsequent layers of this image. You'll see this little later in this lab.It seems counter-intuitive to put this line after the
CMD ["python","app.py"]line. Remember, theCMDline is executed only when the container is started, so you won't get afile not founderror here.And there you have it: a very simple Dockerfile. See the full list of commands that you can put into a Dockerfile. Now that you've defined the Dockerfile, you'll use it to build your custom docker image.
Build the Docker image. Pass in the
-tparameter to name your image python-hello-world.$ docker image build -t python-hello-world . Sending build context to Docker daemon 3.072kB Step 1/4 : FROM python:3.6.1-alpine 3.6.1-alpine: Pulling from library/python acb474fa8956: Pull complete 967ab02d1ea4: Pull complete 640064d26350: Pull complete db0225fcac8f: Pull complete 5432cc692c60: Pull complete Digest: sha256:768360b3fad01adffcf5ad9eccb4aa3ccc83bb0ed341bbdc45951e89335082ce Status: Downloaded newer image for python:3.6.1-alpine ---> c86415c03c37 Step 2/4 : RUN pip install flask ---> Running in cac3222673a3 Collecting flask Downloading Flask-0.12.2-py2.py3-none-any.whl (83kB) Collecting itsdangerous>=0.21 (from flask) Downloading itsdangerous-0.24.tar.gz (46kB) Collecting click>=2.0 (from flask) Downloading click-6.7-py2.py3-none-any.whl (71kB) Collecting Werkzeug>=0.7 (from flask) Downloading Werkzeug-0.12.2-py2.py3-none-any.whl (312kB) Collecting Jinja2>=2.4 (from flask) Downloading Jinja2-2.9.6-py2.py3-none-any.whl (340kB) Collecting MarkupSafe>=0.23 (from Jinja2>=2.4->flask) Downloading MarkupSafe-1.0.tar.gz Building wheels for collected packages: itsdangerous, MarkupSafe Running setup.py bdist_wheel for itsdangerous: started Running setup.py bdist_wheel for itsdangerous: finished with status 'done' Stored in directory: /root/.cache/pip/wheels/fc/a8/66/24d655233c757e178d45dea2de22a04c6d92766abfb741129a Running setup.py bdist_wheel for MarkupSafe: started Running setup.py bdist_wheel for MarkupSafe: finished with status 'done' Stored in directory: /root/.cache/pip/wheels/88/a7/30/e39a54a87bcbe25308fa3ca64e8ddc75d9b3e5afa21ee32d57 Successfully built itsdangerous MarkupSafe Installing collected packages: itsdangerous, click, Werkzeug, MarkupSafe, Jinja2, flask Successfully installed Jinja2-2.9.6 MarkupSafe-1.0 Werkzeug-0.12.2 click-6.7 flask-0.12.2 itsdangerous-0.24 ---> ce41f2517c16 Removing intermediate container cac3222673a3 Step 3/4 : CMD python app.py ---> Running in 2197e5263eff ---> 0ab91286958b Removing intermediate container 2197e5263eff Step 4/4 : COPY app.py /app.py ---> f1b2781b3111 Removing intermediate container b92b506ee093 Successfully built f1b2781b3111 Successfully tagged python-hello-world:latest
Verify that your image shows in your image list:
$ docker image ls REPOSITORY TAG IMAGE ID CREATED SIZE python-hello-world latest f1b2781b3111 26 seconds ago 99.3MB python 3.6.1-alpine c86415c03c37 8 days ago 88.7MB
Notice that your base image, python:3.6.1-alpine, is also in your list.
3. Run the Docker image
Now that you have built the image, you can run it to see that it works.
Run the Docker image:
$ docker run -p 5001:5000 -d python-hello-world 0b2ba61df37fb4038d9ae5d145740c63c2c211ae2729fc27dc01b82b5aaafa26
The
-pflag maps a port running inside the container to your host. In this case, you're mapping the Python app running on port 5000 inside the container to port 5001 on your host. Note that if port 5001 is already being used by another application on your host, you might need to replace 5001 with another value, such as 5002.Navigate to http://localhost:5001 in a browser to see the results.
You should see "hello world!" in your browser.
Check the log output of the container.
If you want to see logs from your application, you can use the
docker container logscommand. By default,docker container logsprints out what is sent to standard out by your application. Use the commanddocker container lsto find the ID for your running container.$ docker container logs [container id] * Running on http://0.0.0.0:5000/ (Press CTRL+C to quit) 172.17.0.1 - - [28/Jun/2017 19:35:33] "GET / HTTP/1.1" 200 -
The Dockerfile is used to create reproducible builds for your application. A common workflow is to have your CI/CD automation run
docker image buildas part of its build process. After images are built, they will be sent to a central registry where they can be accessed by all environments (such as a test environment) that need to run instances of that application. In the next section, you will push your custom image to the public Docker registry, which is the Docker Hub, where it can be consumed by other developers and operators.
4. Push to a central registry
Navigate to Docker Hub and create a free account if you haven't already.
For this lab, you will use the Docker Hub as your central registry. Docker Hub is a free service to publicly store available images. You can also pay to store private images.
Most organizations that use Docker extensively will set up their own registry internally. To simplify things, you will use Docker Hub, but the following concepts apply to any registry.
Log in to the Docker registry account by entering
docker loginon your terminal:$ docker login Login with your Docker ID to push and pull images from Docker Hub. If you don't have a Docker ID, head over to https://hub.docker.com to create one. Username:
Tag the image with your username.
The Docker Hub naming convention is to tag your image with
[dockerhub username]/[image name]. To do this, tag your previously created image python-hello-world to fit that format.$ docker tag python-hello-world [dockerhub username]/python-hello-world
After you properly tag the image, use the
docker pushcommand to push your image to the Docker Hub registry:$ docker push jzaccone/python-hello-world The push refers to a repository [docker.io/jzaccone/python-hello-world] 2bce026769ac: Pushed 64d445ecbe93: Pushed 18b27eac38a1: Mounted from library/python 3f6f25cd8b1e: Mounted from library/python b7af9d602a0f: Mounted from library/python ed06208397d5: Mounted from library/python 5accac14015f: Mounted from library/python latest: digest: sha256:508238f264616bf7bf962019d1a3826f8487ed6a48b80bf41fd3996c7175fd0f size: 1786
Check your image on Docker Hub in your browser.
Navigate to Docker Hub and go to your profile to see your uploaded image.
Now that your image is on Docker Hub, other developers and operators can use the
docker pullcommand to deploy your image to other environments.Remember: Docker images contain all the dependencies that they need to run an application within the image. This is useful because you no longer need to worry about environment drift (version differences) when you rely on dependencies that are installed on every environment you deploy to. You also don't need to follow more steps to provision these environments. Just one step: install docker, and that's it.
5. Deploy a change
Update
app.pyby replacing the string "Hello World" with "Hello Beautiful World!" in app.py.Your file should have the following contents:
from flask import Flask app = Flask(__name__) @app.route("/") def hello(): return "Hello Beautiful World!" if __name__ == "__main__": app.run(host='0.0.0.0')Now that your application is updated, you need to rebuild your app and push it to the Docker Hub registry.
Rebuild the app by using your Docker Hub username in the build command:
$ docker image build -t jzaccone/python-hello-world . Sending build context to Docker daemon 3.072kB Step 1/4 : FROM python:3.6.1-alpine ---> c86415c03c37 Step 2/4 : RUN pip install flask ---> Using cache ---> ce41f2517c16 Step 3/4 : CMD python app.py ---> Using cache ---> 0ab91286958b Step 4/4 : COPY app.py /app.py ---> 3e08b2eeace1 Removing intermediate container 23a955e881fc Successfully built 3e08b2eeace1 Successfully tagged jzaccone/python-hello-world:latest
Notice the "Using cache" for Steps 1 - 3. These layers of the Docker image have already been built, and the
docker image buildcommand will use these layers from the cache instead of rebuilding them.$ docker push jzaccone/python-hello-world The push refers to a repository [docker.io/jzaccone/python-hello-world] 94525867566e: Pushed 64d445ecbe93: Layer already exists 18b27eac38a1: Layer already exists 3f6f25cd8b1e: Layer already exists b7af9d602a0f: Layer already exists ed06208397d5: Layer already exists 5accac14015f: Layer already exists latest: digest: sha256:91874e88c14f217b4cab1dd5510da307bf7d9364bd39860c9cc8688573ab1a3a size: 1786
There is a caching mechanism in place for pushing layers too. Docker Hub already has all but one of the layers from an earlier push, so it only pushes the one layer that has changed.
When you change a layer, every layer built on top of that will have to be rebuilt. Each line in a Dockerfile builds a new layer that is built on the layer created from the lines before it. This is why the order of the lines in your Dockerfile is important. You optimized your Dockerfile so that the layer that is most likely to change (
COPY app.py /app.py) is the last line of the Dockerfile. Generally for an application, your code changes at the most frequent rate. This optimization is particularly important for CI/CD processes where you want your automation to run as fast as possible.
6. Understand image layers
One of the important design properties of Docker is its use of the union file system.
Consider the Dockerfile that you created before:
FROM python:3.6.1-alpine
RUN pip install flask
CMD ["python","app.py"]
COPY app.py /app.py
Each of these lines is a layer. Each layer contains only the delta, or changes from the layers before it. To put these layers together into a single running container, Docker uses the union file system to overlay layers transparently into a single view.
Each layer of the image is read-only except for the top layer, which is created for the container. The read/write container layer implements "copy-on-write," which means that files that are stored in lower image layers are pulled up to the read/write container layer only when edits are being made to those files. Those changes are then stored in the container layer.
The "copy-on-write" function is very fast and in almost all cases, does not have a noticeable effect on performance. You can inspect which files have been pulled up to the container level with the docker diff command. For more information, see the command-line reference on the docker diff command.
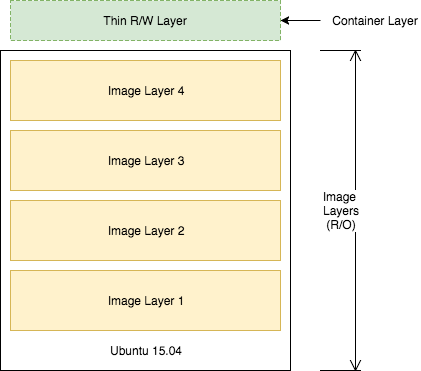
Because image layers are read-only, they can be shared by images and by running containers. For example, creating a new Python application with its own Dockerfile with similar base layers will share all the layers that it had in common with the first Python application.
FROM python:3.6.1-alpine RUN pip install flask CMD ["python","app2.py"] COPY app2.py /app2.py

You can also see the sharing of layers when you start multiple containers from the same image. Because the containers use the same read-only layers, you can imagine that starting containers is very fast and has a very low footprint on the host.
You might notice that there are duplicate lines in this Dockerfile and the Dockerfile that you created earlier in this lab. Although this is a trivial example, you can pull common lines of both Dockerfiles into a base Dockerfile, which you can then point to with each of your child Dockerfiles by using the FROM command.
Image layering enables the docker caching mechanism for builds and pushes. For example, the output for your last docker push shows that some of the layers of your image already exist on the Docker Hub.
$ docker push jzaccone/python-hello-world
The push refers to a repository [docker.io/jzaccone/python-hello-world]
94525867566e: Pushed
64d445ecbe93: Layer already exists
18b27eac38a1: Layer already exists
3f6f25cd8b1e: Layer already exists
b7af9d602a0f: Layer already exists
ed06208397d5: Layer already exists
5accac14015f: Layer already exists
latest: digest: sha256:91874e88c14f217b4cab1dd5510da307bf7d9364bd39860c9cc8688573ab1a3a size: 1786
To look more closely at layers, you can use the docker image history command of the Python image you created.
$ docker image history python-hello-world
IMAGE               CREATED             CREATED BY                                      SIZE                COMMENT
f1b2781b3111        5 minutes ago       /bin/sh -c #(nop) COPY file:0114358808a1bb...   159B
0ab91286958b        5 minutes ago       /bin/sh -c #(nop)  CMD ["python" "app.py"]      0B
ce41f2517c16        5 minutes ago       /bin/sh -c pip install flask                    10.6MB
c86415c03c37        8 days ago          /bin/sh -c #(nop)  CMD ["python3"]              0B
<missing>           8 days ago          /bin/sh -c set -ex;   apk add --no-cache -...   5.73MB
<missing>           8 days ago          /bin/sh -c #(nop)  ENV PYTHON_PIP_VERSION=...   0B
<missing>           8 days ago          /bin/sh -c cd /usr/local/bin  && ln -s idl...   32B
<missing>           8 days ago          /bin/sh -c set -ex  && apk add --no-cache ...   77.5MB
<missing>           8 days ago          /bin/sh -c #(nop)  ENV PYTHON_VERSION=3.6.1     0B
<missing>           8 days ago          /bin/sh -c #(nop)  ENV GPG_KEY=0D96DF4D411...   0B
<missing>           8 days ago          /bin/sh -c apk add --no-cache ca-certificates   618kB
<missing>           8 days ago          /bin/sh -c #(nop)  ENV LANG=C.UTF-8             0B
<missing>           8 days ago          /bin/sh -c #(nop)  ENV PATH=/usr/local/bin...   0B
<missing>           9 days ago          /bin/sh -c #(nop)  CMD ["/bin/sh"]              0B
<missing>           9 days ago          /bin/sh -c #(nop) ADD file:cf1b74f7af8abcf...   4.81MB
Each line represents a layer of the image. You'll notice that the top lines match to the Dockerfile that you created, and the lines below are pulled from the parent Python image. Don't worry about the <missing> tags. These are still normal layers; they have just not been given an ID by the Docker system.
7. Remove the containers
Completing this lab results in a lot of running containers on your host. You'll stop and remove these containers.
Get a list of the containers running by running the command
docker container ls:$ docker container ls CONTAINER ID IMAGE COMMAND CREATED STATUS PORTS NAMES 0b2ba61df37f python-hello-world "python app.py" 7 minutes ago Up 7 minutes 0.0.0.0:5001->5000/tcp practical_kirch
Run
docker container stop [container id]for each container in the list that is running:$ docker container stop 0b2 0b2
Remove the stopped containers by running
docker system prune:$ docker system prune WARNING! This will remove: - all stopped containers - all volumes not used by at least one container - all networks not used by at least one container - all dangling images Are you sure you want to continue? [y/N] y Deleted Containers: 0b2ba61df37fb4038d9ae5d145740c63c2c211ae2729fc27dc01b82b5aaafa26 Total reclaimed space: 300.3kB
Lab 2 summary
In this lab, you started adding value by creating your own custom Docker containers. Remember these key points:
- Use the Dockerfile to create reproducible builds for your application and to integrate your application with Docker into the CI/CD pipeline.
- Docker images can be made available to all of your environments through a central registry. The Docker Hub is one example of a registry, but you can deploy your own registry on servers you control.
- A Docker image contains all the dependencies that it needs to run an application within the image. This is useful because you no longer need to deal with environment drift (version differences) when you rely on dependencies that are installed on every environment you deploy to.
- Docker uses of the union file system and "copy-on-write" to reuse layers of images. This lowers the footprint of storing images and significantly increases the performance of starting containers.
- Image layers are cached by the Docker build and push system. There's no need to rebuild or repush image layers that are already present on a system.
- Each line in a Dockerfile creates a new layer, and because of the layer cache, the lines that change more frequently, for example, adding source code to an image, should be listed near the bottom of the file.
Lab 2 solution video
Question 1
Question 2
Question 3
Question 4
Question 5
Container orchestration overviewSave
Lab 3 overview
So far, you have learned how to run applications by using Docker on your local machine. But what about running Dockerized applications in production? A number of problems come with building an application for production, for example:
- Scheduling services across distributed nodes
- Maintaining high availability
- Implementing reconciliation
- Scaling
- Logging
Several orchestration solutions are available to help you solve some of these problems. One example is the IBM Cloud Kubernetes Service, which uses Kubernetes to run containers in production.
Before you learn about Kubernetes, you will learn how to orchestrate applications by using Docker Swarm. Docker Swarm is the orchestration tool that is built in to the Docker Engine.
This lab uses a few Docker commands. For a complete list of commands, see the Docker documentation.
To complete a lab about orchestrating an application that is deployed across multiple hosts, you need multiple hosts. To make things easier, this lab uses the multi-node support provided by Play-with-Docker. This is the easiest way to test Docker Swarm without having to install Docker on multiple hosts.
Be sure you have a Docker Hub account.
1. Create your first swarm
In this section, you will create your first swarm by using Play-with-Docker.
Navigate to Play-with-Docker. You're going to create a swarm with three nodes.
- Click Add new instance on the left side three times to create three nodes.
- Initialize the swarm on node 1:
$ docker swarm init --advertise-addr eth0
Swarm initialized: current node (vq7xx5j4dpe04rgwwm5ur63ce) is now a manager.

To add a worker to this swarm, run the following command:

    docker swarm join \
    --token SWMTKN-1-50qba7hmo5exuapkmrj6jki8knfvinceo68xjmh322y7c8f0pj-87mjqjho30uue43oqbhhthjui \
    10.0.120.3:2377

To add a manager to this swarm, run 'docker swarm join-token manager' and follow the instructions.
You can think of Docker Swarm as a special mode that is activated by the command:
docker swarm init. The--advertise-addroption specifies the address in which the other nodes will use to join the swarm.This
docker swarm initcommand generates a join token. The token makes sure that no malicious nodes join the swarm. You need to use this token to join the other nodes to the swarm. For convenience, the output includes the full commanddocker swarm join, which you can just copy/paste to the other nodes. - On both node2 and node3, copy and run the
docker swarm joincommand that was outputted to your console by the last command.You now have a three-node swarm!
- Back on node1, run
docker node lsto verify your three-node cluster:$ docker node ls ID HOSTNAME STATUS AVAILABILITY MANAGER STATUS 7x9s8baa79l29zdsx95i1tfjp node3 Ready Active x223z25t7y7o4np3uq45d49br node2 Ready Active zdqbsoxa6x1bubg3jyjdmrnrn * node1 Ready Active Leader
This command outputs the three nodes in your swarm. The asterisk (*) next to the ID of the node represents the node that handled that specific command (
docker node lsin this case).Your node consists of one manager node and two workers nodes. Managers handle commands and manage the state of the swarm. Workers cannot handle commands and are simply used to run containers at scale. By default, managers are also used to run containers.
All docker service commands for the rest of this lab need to be executed on the manager node (Node1).
Note: Although you control the swarm directly from the node in which its running, you can control a Docker swarm remotely by connecting to the Docker Engine of the manager by using the remote API or by activating a remote host from your local Docker installation (using the $DOCKER_HOST and $DOCKER_CERT_PATH environment variables). This will become useful when you want to remotely control production applications, instead of using SSH to directly control production servers.
2. Deploy your first service
Now that you have your three-node Swarm cluster initialized, you'll deploy some containers. To run containers on a Docker Swarm, you need to create a service. A service is an abstraction that represents multiple containers of the same image deployed across a distributed cluster.
Let's do a simple example using NGINX. For now, you will create a service with one running container, but you will scale up later.
Deploy a service by using NGINX:
$ docker service create --detach=true --name nginx1 --publish 80:80  --mount source=/etc/hostname,target=/usr/share/nginx/html/index.html,type=bind,ro nginx:1.12
pgqdxr41dpy8qwkn6qm7vke0q
This command statement is declarative, and Docker Swarm will try to maintain the state declared in this command unless explicitly changed by another
docker servicecommand. This behavior is useful when nodes go down, for example, and containers are automatically rescheduled on other nodes. You will see a demonstration of that a little later in this lab.The
--mountflag is useful to have NGINX print out the hostname of the node it's running on. You will use this later in this lab when you start load balancing between multiple containers of NGINX that are distributed across different nodes in the cluster and you want to see which node in the swarm is serving the request.You are using NGINX tag
1.12in this command. You will see a rolling update with version 1.13 later in this lab.The
--publishcommand uses the swarm's built-in routing mesh. In this case, port 80 is exposed on every node in the swarm. The routing mesh will route a request coming in on port 80 to one of the nodes running the container.Inspect the service. Use the command
docker service lsto inspect the service you just created:$ docker service ls ID NAME MODE REPLICAS IMAGE PORTS pgqdxr41dpy8 nginx1 replicated 1/1 nginx:1.12 *:80->80/tcp
Check the running container of the service.
To take a deeper look at the running tasks, use the command
docker service ps. A task is another abstraction in Docker Swarm that represents the running instances of a service. In this case, there is a 1-1 mapping between a task and a container.$ docker service ps nginx1 ID NAME IMAGE NODE DESIRED STATE CURRENT STATE ERROR PORTS iu3ksewv7qf9 nginx1.1 nginx:1.12 node1 Running Running 8 minutes ago
If you know which node your container is running on (you can see which node based on the output from
docker service ps), you can use the commanddocker container lsto see the container running on that specific node.Test the service.
Because of the routing mesh, you can send a request to any node of the swarm on port 80. This request will be automatically routed to the one node that is running the NGINX container.
Try this command on each node:
$ curl localhost:80
node1
Curling will output the hostname where the container is running. For this example, it is running on node1, but yours might be different.
3. Scale your service
Level 2 headings may be created by course providers in the future.
In production, you might need to handle large amounts of traffic to your application, so you'll learn how to scale.
Update your service with an updated number of replicas.
Use the
docker servicecommand to update the NGINX service that you created previously to include 5 replicas. This is defining a new state for the service.$ docker service update --replicas=5 --detach=true nginx1 nginx1
When this command is run, the following events occur:
- The state of the service is updated to 5 replicas, which is stored in the swarm's internal storage.
- Docker Swarm recognizes that the number of replicas that is scheduled now does not match the declared state of 5.
- Docker Swarm schedules 5 more tasks (containers) in an attempt to meet the declared state for the service.
This swarm is actively checking to see if the desired state is equal to actual state and will attempt to reconcile if needed.
Check the running instances.
After a few seconds, you should see that the swarm did its job and successfully started 9 more containers. Notice that the containers are scheduled across all three nodes of the cluster. The default placement strategy that is used to decide where new containers are to be run is the emptiest node, but that can be changed based on your needs.
$ docker service ps nginx1

Send a lot of requests to http://localhost:80.
The
--publish 80:80parameter is still in effect for this service; that was not changed when you ran thedocker service updatecommand. However, now when you send requests on port 80, the routing mesh has multiple containers in which to route requests to. The routing mesh acts as a load balancer for these containers, alternating where it routes requests to.Try it out by curling multiple times. Note that it doesn't matter which node you send the requests. There is no connection between the node that receives the request and the node that that request is routed to.
$ curl localhost:80
node3
$ curl localhost:80
node3
$ curl localhost:80
node2
$ curl localhost:80
node1
$ curl localhost:80
node1
You should see which node is serving each request because of the useful
--mountcommand you used earlier.Limits of the routing mesh: The routing mesh can publish only one service on port 80. If you want multiple services exposed on port 80, you can use an external application load balancer outside of the swarm to accomplish this.
Check the aggregated logs for the service.
Another easy way to see which nodes those requests were routed to is to check the aggregated logs. You can get aggregated logs for the service by using the command
docker service logs [service name]. This aggregates the output from every running container, that is, the output fromdocker container logs [container name].$ docker service logs nginx1

Based on these logs, you can see that each request was served by a different container.
In addition to seeing whether the request was sent to node1, node2, or node3, you can also see which container on each node that it was sent to. For example,
nginx1.5means that request was sent to a container with that same name as indicated in the output of the commanddocker service ps nginx1.
4. Apply rolling updates
Now that you have your service deployed, you'll see a release of your application. You are going to update the version of NGINX to version 1.13.
Run the
docker service updatecommand:$ docker service update --image nginx:1.13 --detach=true nginx1
This triggers a rolling update of the swarm. Quickly enter the command
docker service ps nginx1over and over to see the updates in real time.You can fine-tune the rolling update by using these options:
--update-parallelism: specifies the number of containers to update immediately (defaults to 1).--update-delay:specifies the delay between finishing updating a set of containers before moving on to the next set.
After a few seconds, run the command
docker service ps nginx1to see all the images that have been updated to nginx:1.13.$ docker service ps nginx1

You have successfully updated your application to the latest version of NGINX.
5. Reconcile problems with containers
In the previous section, you updated the state of your service by using the command docker service update. You saw Docker Swarm in action as it recognized the mismatch between desired state and actual state, and attempted to solve the issue.
The inspect-and-then-adapt model of Docker Swarm enables it to perform reconciliation when something goes wrong. For example, when a node in the swarm goes down, it might take down running containers with it. The swarm will recognize this loss of containers and will attempt to reschedule containers on available nodes to achieve the desired state for that service.
You are going to remove a node and see tasks of your nginx1 service be rescheduled on other nodes automatically.
- To get a clean output, create a new service by copying the following line. Change the name and the publish port to avoid conflicts with your existing service. Also, add the
--replicasoption to scale the service with five instances:$ docker service create --detach=true --name nginx2 --replicas=5 --publish 81:80 --mount source=/etc/hostname,target=/usr/share/nginx/html/index.html,type=bind,ro nginx:1.12 aiqdh5n9fyacgvb2g82s412js
- On node1, use the
watchutility to watch the update from the output of thedocker service pscommand.Tip:
watchis a Linux utility and might not be available on other operating systems.$ watch -n 1 docker service ps nginx2
This command should create output like this:

- Click node3 and enter the command to leave the swarm cluster:
$ docker swarm leave
Tip: This is the typical way to leave the swarm, but you can also kill the node and the behavior will be the same.
Click node1 to watch the reconciliation in action. You should see that the swarm attempts to get back to the declared state by rescheduling the containers that were running on node3 to node1 and node2 automatically.

6. Determine how many nodes you need
In this lab, your Docker Swarm cluster consists of one master and two worker nodes. This configuration is not highly available. The manager node contains the necessary information to manage the cluster, but if this node goes down, the cluster will cease to function. For a production application, you should provision a cluster with multiple manager nodes to allow for manager node failures.
You should have at least three manager nodes but typically no more than seven. Manager nodes implement the raft consensus algorithm, which requires that more than 50% of the nodes agree on the state that is being stored for the cluster. If you don't achieve more than 50% agreement, the swarm will cease to operate correctly. For this reason, note the following guidance for node failure tolerance:
- Three manager nodes tolerate one node failure.
- Five manager nodes tolerate two node failures.
- Seven manager nodes tolerate three node failures.
It is possible to have an even number of manager nodes, but it adds no value in terms of the number of node failures. For example, four manager nodes will tolerate only one node failure, which is the same tolerance as a three-manager node cluster. However, the more manager nodes you have, the harder it is to achieve a consensus on the state of a cluster.
While you typically want to limit the number of manager nodes to no more than seven, you can scale the number of worker nodes much higher than that. Worker nodes can scale up into the thousands of nodes. Worker nodes communicate by using the gossip protocol, which is optimized to be perform well under a lot of traffic and a large number of nodes.
If you are using Play-with-Docker, you can easily deploy multiple manager node clusters by using the built in templates. Click the Templates icon in the upper left to view the available templates.
Lab 3 summary
In this lab, you got an introduction to problems that come with running containers in production, such as scheduling services across distributed nodes, maintaining high availability, implementing reconciliation, scaling, and logging. You used the orchestration tool that comes built-in to the Docker Engine, Docker Swarm, to address some of these issues.
Remember these key points:
- Docker Swarm schedules services by using a declarative language. You declare the state, and the swarm attempts to maintain and reconcile to make sure the actual state equals the desired state.
- Docker Swarm is composed of manager and worker nodes. Only managers can maintain the state of the swarm and accept commands to modify it. Workers have high scalability and are only used to run containers. By default, managers can also run containers.
- The routing mesh built into Docker Swarm means that any port that is published at the service level will be exposed on every node in the swarm. Requests to a published service port will be automatically routed to a container of the service that is running in the swarm.
- You can use other tools to help solve problems with orchestrated, containerized applications in production, including Docker Swarm and the IBM Cloud Kubernetes Service.
No comments:
Post a Comment